In some situations, you may need to record videos on the screen. You don’t always want and be able to download a video, sometimes you can just record it as fast as you can as long as it’s circulating on your screen. You need a screen recorder for that. On the market you can find some, unfortunately most of the time the video recorder cannot record video in original quality, and to make matters worse, you may need to have some previous recording experience.
Joyoshare Screen Recorder comes in for this situation. This screen recording device comes with a wide variety of functions and features, making it one of the most prominent screen recording devices on the market. This screen recorder is capable of recording all video and audio in almost any format and in the same high quality as the original version. Compatible with the latest Windows versions, it is recommended for every Windows user.
Like other screen recording tools, Joyoshare Screen Recorder offers the following main functions:
– Unlimited high quality video recording.
– Ability to capture sounds from different sources, including system and microphones. This is possible thanks to its independent audio recorder.
– Ability to cut recorded files to several different segments.
– Ability to skip unwanted video content.
– Not only recording, this tool can also customize captured area such as applying watermark, scheduling task, setting shortcut, highlighting cursor, and many more.
– Save both video and audio files in various popular formats such as MP3, MP4, WMV, and so on.
Here are the steps required to record a video or movie with Joyoshare Screen Recorder:
- Download and install the software on your Windows PC. Then launch the program by clicking the software icon on the desktop. After you launch the program, you will see the following window:

- Select the recorded area
See the ‘Capture Area’ in the image above? Click ‘+’ and you will see a recording window popped up. You can select the full-screen recorded area or custom it by moving and scaling the window. Want to set the size of recorded window? Click the drop-down menu and select the recorded window size. You can choose 320×240, 640×480, 1280×720, etc. There are various sizes to choose from.
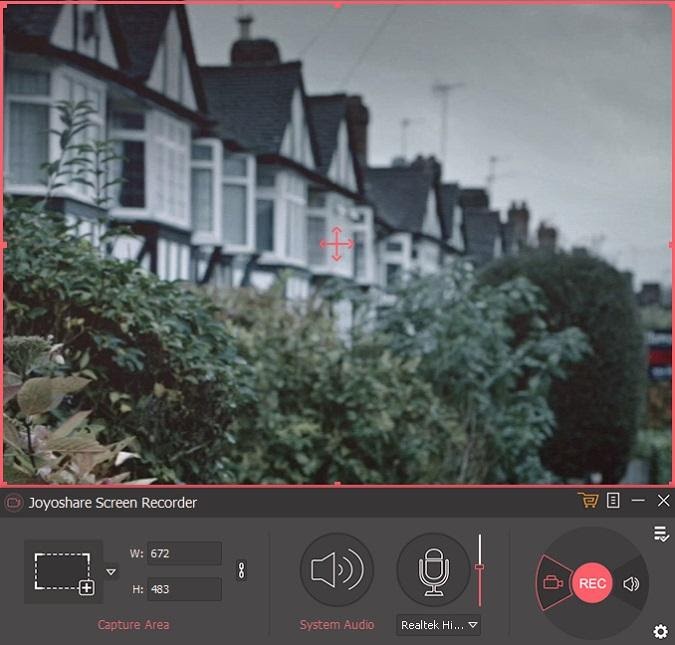
By default, this software will record video and audio simultaneously. But you can record them separately. The trick is to press the System Audio icon to disable audio recording. Want to record voices in a video conference? You are allowed to select different microphone speakers. What if you want to record videos from online sources like YouTube, DailyMotion, and Facebook while you are in a noisy environment? You can disable the microphone and only enable system audio. So you can produce recordings without noise (annoying background noises). But Joyoshare Screen Recorder can also record audio only. You can see a microphone icon to the right of the Rec button. Click on it to record audio only (without video).
- Now is time to customize before recording
Of course you want to apply some settings before recording. You don’t want record the video directly. Click the setting icon at bottom right corner of the interface above and check out the interface below:
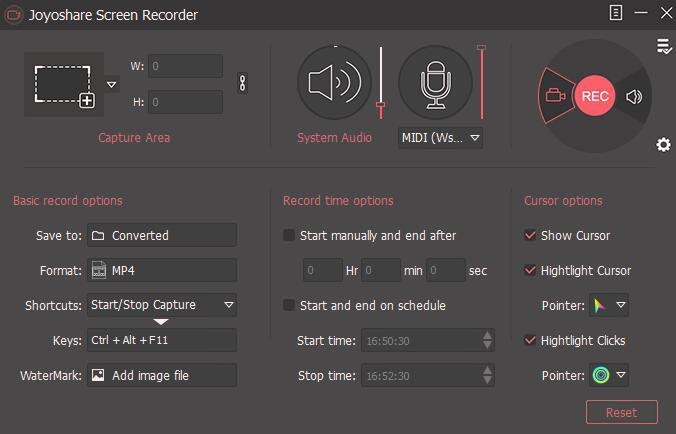
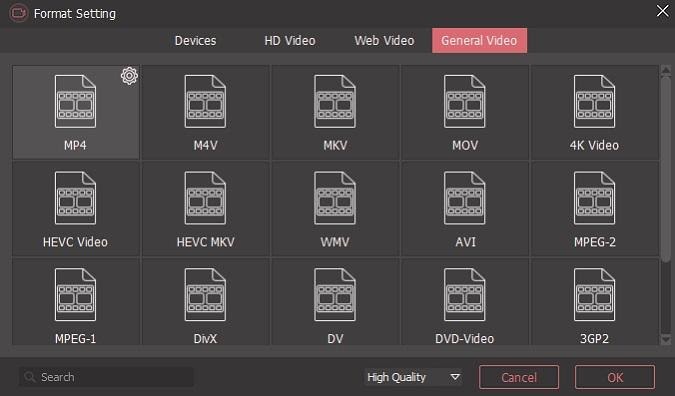
You can see that you have a lot to choose from before you record. You can choose an output format, apply a watermark, highlight cursor, highlight clicks, schedule recording tasks, etc. Make sure you have set it according to your needs before actually recording. For additional information, Joyoshare Screen Recorder now supports more output formats than the previous version. This software also supports more devices such as game consoles, smart TVs, and many more. You can see the interface below:
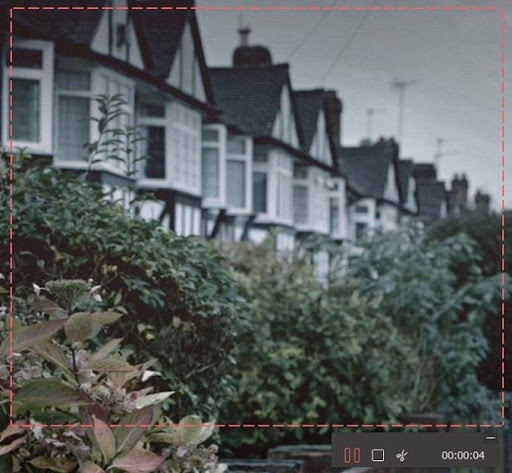
- Can’t wait to start recording? This time! After you have set the various parameters above, now is the time to record. Open the video you want to record and click the REC button to start recording. Want to take screenshots during the recording process? Don’t worry! You can take them whenever you want. Just use the shortcut you set before to take the screenshots.
- Make sure to review before actually exporting the recording
Click ‘Stop’ to stop recording. And after that you can preview the footage before actually exporting it. You can preview the recording in the History window, trim it, and change the file name and ID3 tags.

Pricing:
You can use Joyoshare Screen Recorder for FREE but with a number of restrictions such as default watermark, Limited Recording Duration, and no Technical Support. If you shoot videos or films regularly or want to become a professional content provider, switching to the paid version is highly recommended. By paying only $ 29.95 you can get rid of the above limitations. Very affordable!
Conclusion:
Joyoshare Screen Recorder is a multi-functional screen recorder. You will not get these functions and features in other free screen recorders. Again, you can try the “Free Trial” to use the tool for free before deciding if you need to switch to the paid version.
- Acting - /100/10
- Cinematography/Visual Effects - /100/10
- Plot/Screenplay - /100/10
- Setting/Theme - /100/10
- Watchability - /100/10
- Rewatchability - /100/10
User Review
( votes)Warning: Illegal string offset 'Movie' in /home/themov15/public_html/wp-content/plugins/wp-review-pro/includes/functions.php on line 2358


How to download?